MyDesigns to Printful Workflow: Bulk Upload Guide (2026)
Managing a high-volume print-on-demand store manually is a guaranteed recipe for burnout. Sourcing incredible graphic elements is only half the battle. Uploading them one by one across multiple shirt variants, sizes, and colors eats up hours of design time.
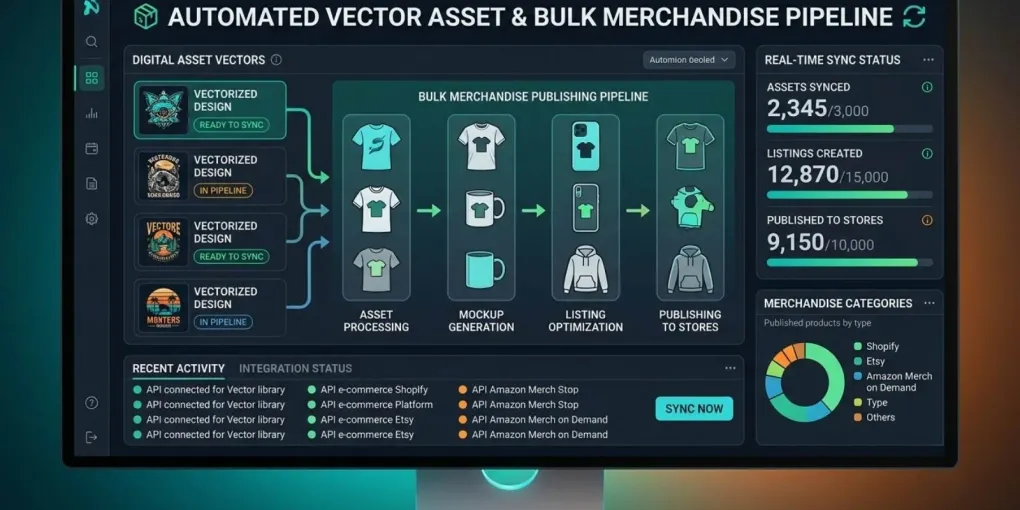
By connecting your assets into a unified MyDesigns to Printful workflow, you transform your digital library into an automated publishing powerhouse. Here is how to configure the perfect pipeline to scale your merchandise brand without touching local server storage.
For a complete overview of MyDesigns as a platform, read our MyDesigns Review 2026.
Setting Up the Integration Architecture
Before pushing hundreds of assets through your pipeline, the backend systems must communicate cleanly.
Step 1: Connect Printful
- Log in to your Printful dashboard.
- Go to Stores → Add Store.
- Connect your Etsy, Shopify, or WooCommerce storefront.
- Configure your shipping profiles and product pricing rules.
Step 2: Connect MyDesigns to Printful
- Open your MyDesigns backend.
- Navigate to Settings → Integrations.
- Authorize the Printful API connection.
- Select the Printful store you want to sync with.
This bridge allows MyDesigns to read your catalog blueprints, live shipping profiles, and active product templates in real time. Once configured, you will never need to manually construct a listing layout inside the print provider dashboard again.
For more on automated listing workflows, check our BulkMockup vs MyDesigns comparison.
Standardizing Your Cloud Asset Storage
Bulk uploading requires clean data mapping. Instead of sorting files haphazardly, upload your high-resolution, transparent PNG graphics into centralized cloud datasets inside MyDesigns.
File Requirements
| Requirement | Spec |
|---|---|
| File format | PNG (transparent background) |
| Resolution | 4500×5400 pixels minimum |
| File naming | kebab-case (e.g., dark-academia-archivist.png) |
| Color space | sRGB (for accurate print colors) |
Organize Your Files
- Create collections in MyDesigns for each niche (e.g., Dark Academia, TTRPG, Gothic Macabre).
- Upload all PNGs for that collection.
- Apply bulk metadata — add titles, descriptions, and tags to the entire batch simultaneously.
💡 Pro tip: Keep your keyword structure focused. For Redbubble, cap at 15 tags maximum to avoid spam penalties. For Etsy, focus on long-tail keywords and visual aesthetics.
For detailed guidance on file naming, read our standardized file naming guide.
The Publishing Pipeline: Step-by-Step
With your metadata applied, select your target assets and initiate the publishing wizard.
Step 1: Select the Base Variant
Choose your target apparel from the live catalog:
- Premium hoodies
- Heavy cotton t-shirts
- Crewneck sweatshirts
- Accessories (mugs, tote bags)
Step 2: Apply the Design Layer
Map your transparent artwork onto the designated print area.
Critical rule for hoodies: Keep your design centered on the chest and positioned strictly above the pocket line. This guarantees a professional, retail-ready finish that won’t clip over seams or pockets.
Step 3: Automate Mockup Staging
Generate high-resolution, professional product imagery directly within MyDesigns. The system creates:
- Product thumbnails
- Lifestyle mockups
- Size and color variations
Step 4: Push Live
- Review price margins.
- Verify automated description templates.
- Click Publish.
The system pushes the files, mockups, and retail listings directly to your Printful-connected storefront.
Once a customer places an order, Printful fulfills the request automatically — tracking inventory and logistics without requiring your daily manual intervention.
For a practical guide on setting up PSD automation before the publishing stage, read our BulkMockup automation guide.
Maximizing Workflow Efficiency
Standardizing your asset positioning ensures that your storefront mockups maintain a consistent, high-end look across your entire catalog. This level of professional staging is exactly what search engines look for when crawling digital brands.
Efficiency Gains
| Metric | Manual Workflow | MyDesigns + Printful |
|---|---|---|
| Time per listing | 5-10 minutes | 30 seconds |
| Mockup generation | Manual (per variant) | Automated (bulk) |
| Metadata consistency | Inconsistent | Uniform |
| Error rate | High | Low |
| Weekly time saved | 0 | 20+ hours |
Best Practices for Bulk Uploads
- Always test with 3-5 designs before pushing a full batch.
- Review print area placement on hoodies and complex garments.
- Check all mockup variants before publishing to avoid weird crops.
- Use consistent metadata — your brand voice should be recognizable across all listings.
Frequently asked questions
Can I automate bulk listings from MyDesigns to Printful?
Yes. MyDesigns acts as your centralized cloud repository where you can generate mockups, apply metadata, and push hundreds of listings directly to Printful via API integration. This eliminates manual uploads for each individual product variant.
How does MyDesigns sync with Printful store products?
Once you connect your storefront via Printful, MyDesigns maps your uploaded design layers directly onto Printful base variants. It automatically generates all size and color variations for each product, automating the listing creation process.
Is the MyDesigns to Printful integration free to use?
Both platforms offer free starter tiers to connect your shops. However, automated bulk processing and advanced data publishing pipelines require active subscription tiers on MyDesigns (starting at $29.99/month). Printful's free tier is sufficient for basic integration.
What are the asset requirements for bulk uploading apparel designs?
Upload high-resolution, transparent PNG files with a minimum resolution of 4500×5400 pixels. For professional apparel production, ensure your graphics are sized to fit centered on the chest and strictly above the hoodie pocket line. Use kebab-case file names without spaces or special characters.
More from this series