How to Optimize PNG File Sizes for Fast POD Websites (2026)
Visual asset quality is non-negotiable for modern web builds. High-resolution screenshots, digital illustrations, transparent product mockups, and rich user interface graphics build immediate user trust.
However, high quality often comes with a massive performance tax. Among standard web image formats, the PNG (Portable Network Graphics) is heavily favored by digital creators due to its lossless compression and flawless support for alpha-channel transparency.
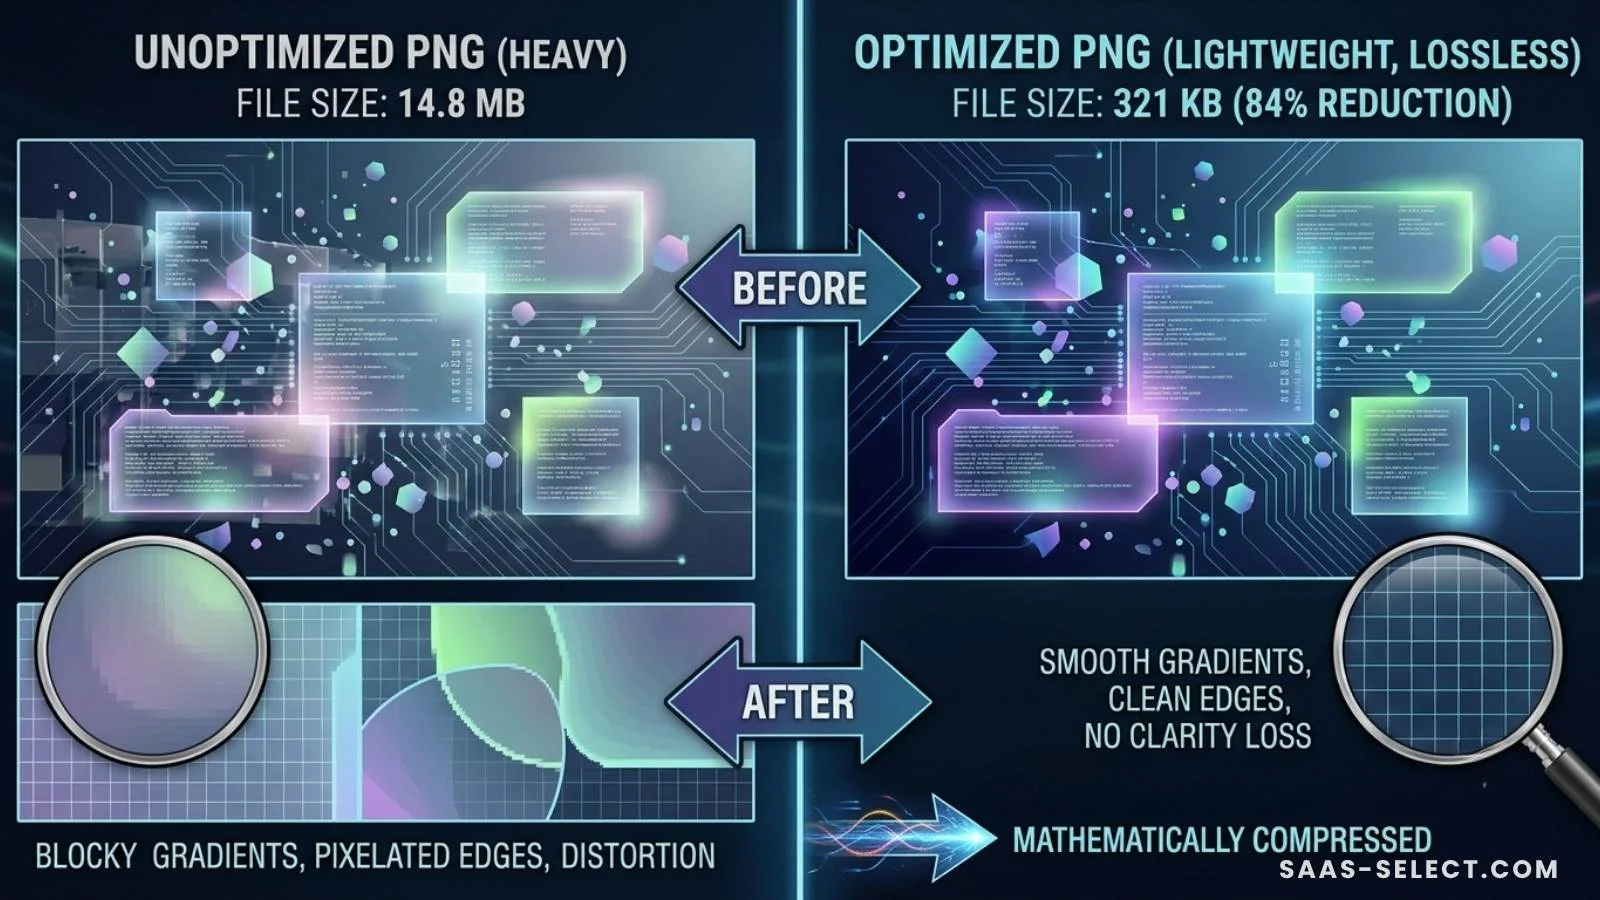
But unoptimized PNGs are notoriously heavy. Serving bloated multi-megabyte images to your visitors destroys your page load speeds, spikes bounce rates, and damages your organic ranking positions on Bing and Google.
To maintain a pristine user experience, you must compress and optimize your PNG assets programmatically before deployment. Here is the technical blueprint to achieving lightweight, fast-loading images without sacrificing visual fidelity.
For a complete overview of how site architecture impacts performance, read our comparison of static sites vs traditional CMS.
Why PNG Optimization Matters for POD Sellers
If you’re a print-on-demand seller, you handle a lot of images. Product mockups, lifestyle photos, design assets, and transparent PNGs for your storefront. These files can quickly become the heaviest assets on your site.
An average POD mockup from BulkMockup or MyDesigns can weigh 2-5 MB. If your homepage loads 10 of these, you’re asking visitors to download 20-50 MB of data. On mobile, that’s 5-10 seconds of loading time. Most users will leave before the page fully loads.
Optimizing these PNGs is not just a nice-to-have. It’s a requirement for keeping your bounce rate low and your conversion rate high.
The Technical Anatomy of a PNG File
To optimize a file effectively, you must understand how it stores data. Unlike lossy formats like JPEG — which permanently discard pixel data to shrink file sizes — PNG is a lossless format utilizing the DEFLATE compression algorithm.
A standard PNG file size is determined by three main elements:
- Color Depth: PNGs store pixels in 24-bit Truecolor along with an 8-bit alpha channel for transparency, commonly referred to as PNG-32.
- Metadata Chunks: Image files often store hidden, non-visual data payload clusters containing color profiles (iCC profiles), creation dates, software signatures, and orientation data.
- Pixel Redundancy: The efficiency of how row-by-row pixel patterns are filtered and compressed by the layout engine.
Step-by-Step PNG Optimization Protocol
To strip the weight off your visual assets without losing their crisp edges, implement this technical production sequence into your daily publishing workflow:
1. Execute Dimensional Scaling First
The absolute most common mistake web editors make is uploading an image with raw display dimensions far larger than the target container on the website. If your blog content column is maximum 800 pixels wide, uploading a 4000-pixel-wide master screenshot forces the user’s browser to download a massive file and manually scale it down locally.
Always crop and resize your assets to their exact maximum required layout dimensions inside your design environment prior to applying compression layers.
For your POD mockups, this is especially important. If your blog uses a 1020×510 hero image, don’t upload a 3000×1500 mockup from your tool. Resize it first.
2. Strip Hidden Metadata Chunks
When you export an asset from major professional design suites, the software automatically embeds extensive ancillary data chunks into the file structure. These bytes are completely useless to a web browser rendering a webpage.
By utilizing localized command-line utility tools or asset cleaning software, you can purge these hidden bytes completely, instantly reducing file size by 10% to 15% without altering a single pixel on screen.
3. Transition from PNG-32 to Indexed PNG-8
If your graphic asset consists of flat colors, simple vector illustrations, user interface screenshots, or minimalist typography, you rarely need millions of color variations.
Converting an image to an Indexed PNG-8 color profile restricts the image to a maximum palette of 256 carefully selected colors. This architectural shift slashes the file size by up to 70% while maintaining pixel-perfect sharp borders and functional transparency.
Local Utility Tools vs. Automated Pipeline Integrations
Depending on your workflow scale, you can choose between localized manual utilities or integrating automated scripts directly into your deployment pipelines:
Local Desktop Utilities
- OptiPNG / PNGOUT: Powerful, localized command-line utilities that re-compress PNG files to their absolute minimal size by testing multiple compression algorithms and filtering strategies completely offline.
- PNGQuant: A specialized lossy optimization utility that masterfully converts heavy PNG-32 files into highly optimized 8-bit indexed images with full alpha transparency support.
The Automated Engine Approach
Because SaaS Select is built using the high-performance static framework Astro, you can leverage automated asset processing packages directly inside your framework configuration.
Instead of manually compressing every single image file before writing your content, Astro’s native image optimization components can automatically catch your Markdown assets during the production build phase, compressing them, stripping metadata, and converting them into highly efficient modern formats like WebP or AVIF automatically.
For a practical guide on implementing automated workflows, check our guide on organizing and tagging digital assets.
Performance Metrics: The Impact of Image Optimization
| Image Optimization State | Average File Size | Mobile Loading Speed Impact | Core Web Vitals Status |
|---|---|---|---|
| Unoptimized Raw PNG Export | 2.5 MB – 5.0 MB | Catastrophic Delay (High Latency) | Failing Grade (LCP Bottleneck) |
| Scaled & Metadata-Stripped PNG | 400 KB – 800 KB | Moderate (Acceptable on Desktop) | Warning State |
| Optimized PNG-8 / WebP Format | 40 KB – 120 KB | Near-Instantaneous Loading | Perfect Passed Grade (Green LCP) |
Speed is a Core Feature
Web asset optimization is not an afterthought; it is a fundamental pillar of modern Search Engine Optimization and digital user experience. A website that loads in milliseconds keeps users engaged, reduces bounce rates, and signals maximum operational professionalism to algorithmic web indexers.
By establishing a strict compression workflow — scaling dimensions properly, stripping useless metadata, and leveraging intelligent compilation frameworks like Astro — you take total control of your data footprint. Keep your visual graphics remarkably sharp, your file sizes remarkably light, and watch your platform speed metrics soar.
For more on image optimization in the context of POD mockups, read our BulkMockup automation guide and our approach to file naming conventions.
Frequently Asked Questions
What is the best tool to optimize PNG files for web?
For local optimization, OptiPNG, PNGOUT, and PNGQuant are excellent command-line utilities. For automated workflows, Astro’s native image optimization components can compress PNGs and convert them to WebP during the build phase. Online tools like TinyPNG are great for quick one-off optimizations.
Does PNG optimization affect image quality?
Lossless compression (OptiPNG, PNGOUT) preserves 100% of image quality. Lossy compression (PNGQuant) reduces file size by reducing color depth, which can cause minor quality loss. For POD product images with gradients or complex designs, lossless is recommended. For simple flat graphics, lossy is perfectly fine and saves more space.
Should I use PNG or WebP for my POD blog?
WebP is generally better for web use — it offers 25-35% smaller file sizes than PNG with comparable quality. However, PNG is still useful for images requiring transparency or for legacy compatibility. Astro can automatically convert your PNGs to WebP during the build process, giving you the best of both worlds.
How can I automate PNG optimization in my workflow?
If you’re using a static site generator like Astro, you can use the built-in <Image /> component to optimize images during the build. For manual batch processing, you can run command-line tools like optipng or pngquant on your entire image folder. Setting up a CI/CD pipeline with these tools ensures every new asset is automatically optimized.
More from this series